To reduce electricity costs I wanted a solar and home battery installation.
Since the quotes we received were quite high at around €14.000 I decided to build it myself. For €7.000 I was able to build an equivalent installation with higher quality components.
A great deal of my knowledge and experience needed for this project came from my first solar project in 2020.
These are the most important specifications:
- 5.3Kwp solar power
- 9.5Kwh battery
- 4Kw inverter
- Peak shaving capability
- Dynamic ESS and energy trading
Solar panels
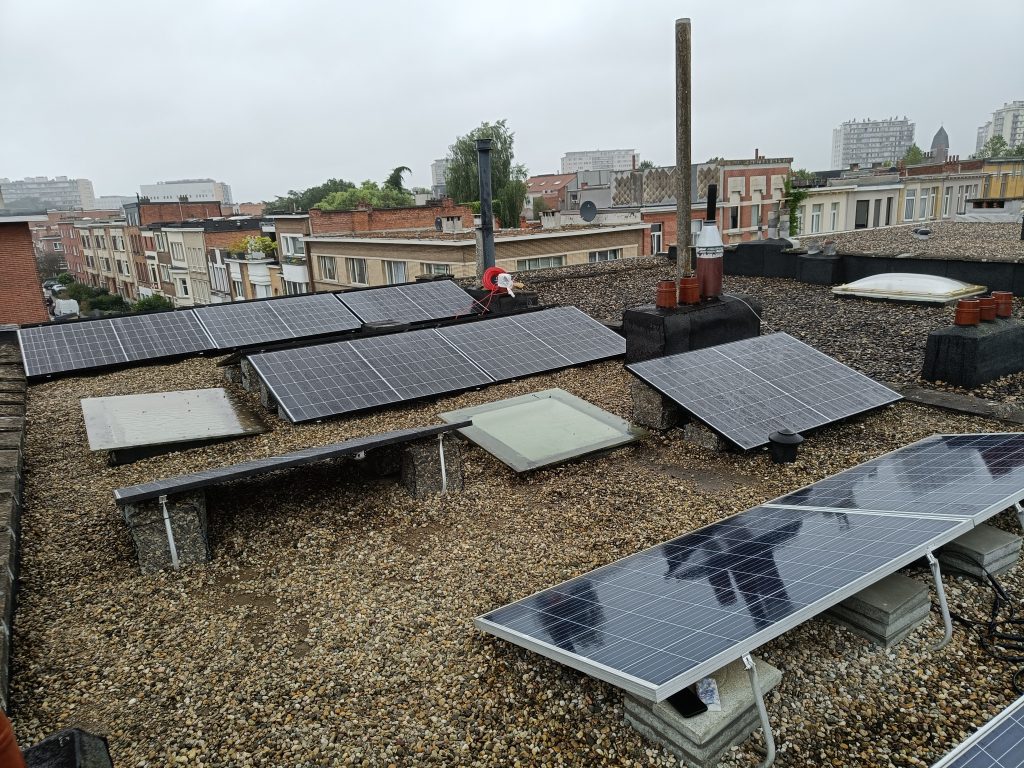
Specifications for total installation
- 5280Wp SCT / 3972Wp NOCT
- East/West configuration
- 3s 2P per MPPT
- 12 panels total
Specifications per panel
- 440Wp SCT / 331Wp NOCT
- 22.02% efficiency
- 39.38V open circuit
- 13.86A short circuit
specifications per MPPT
- 2640Wp SCT / 1986Wp NOCT
- 118.14V open circuit
- 27.72A short circuit
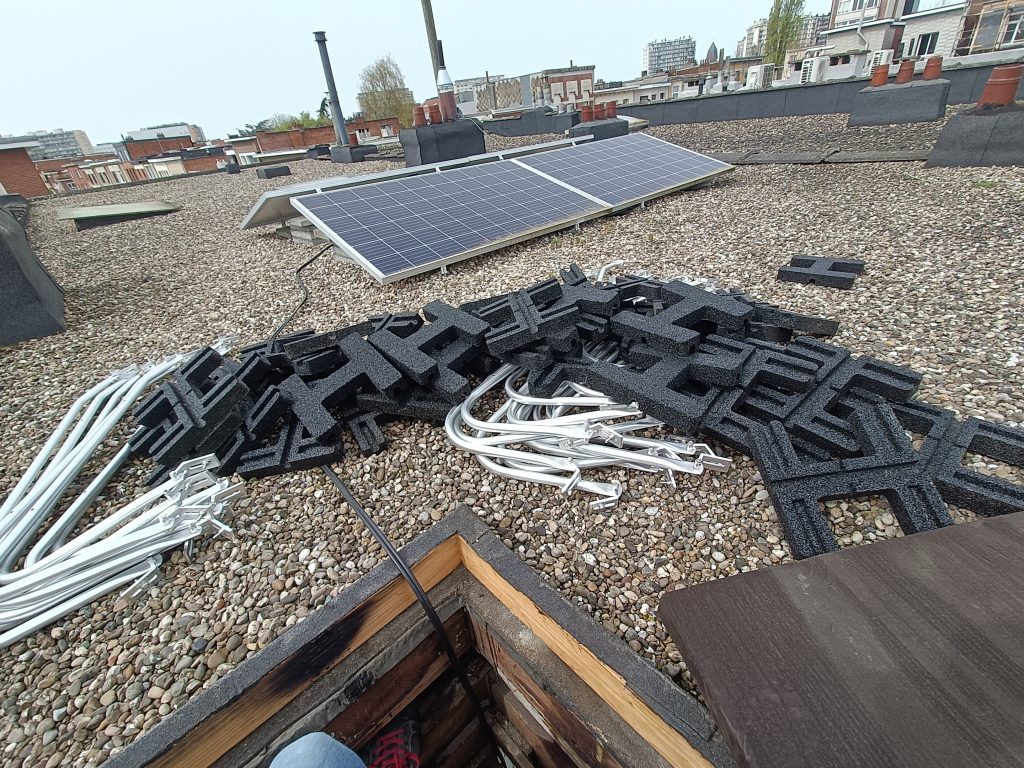
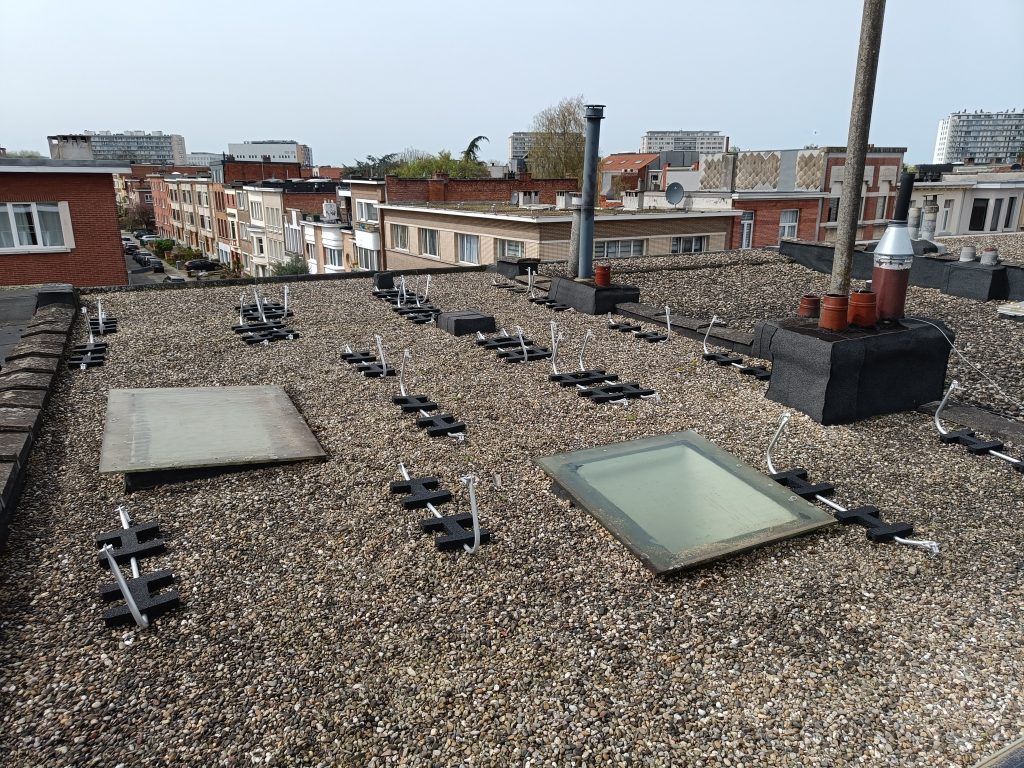
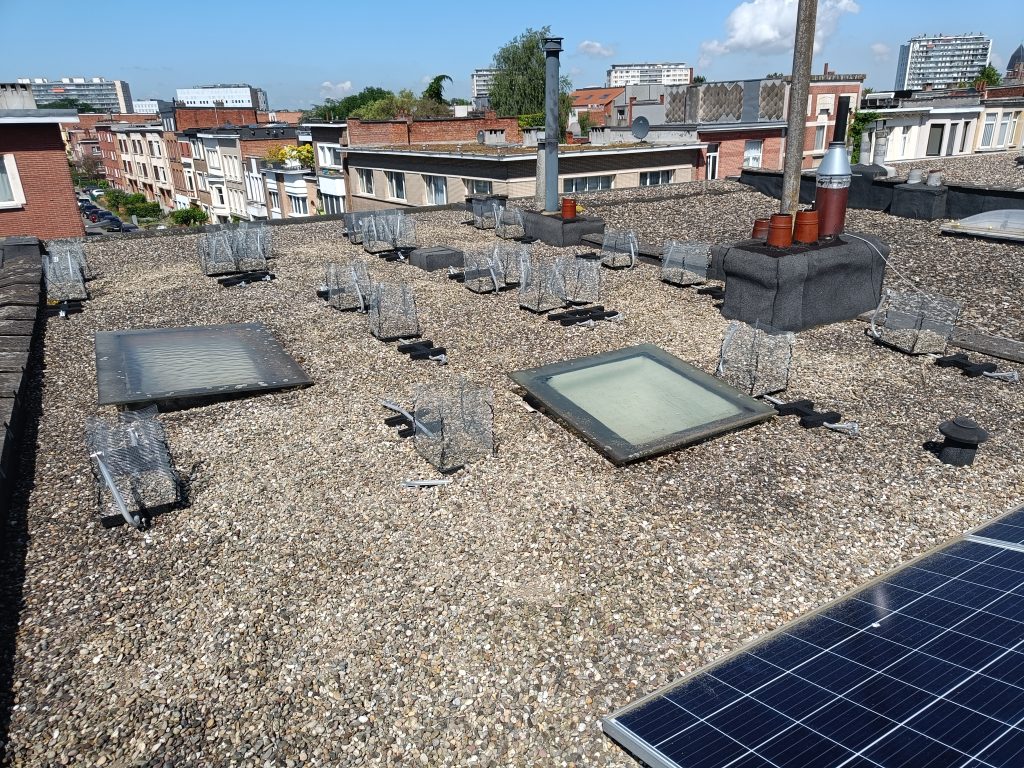
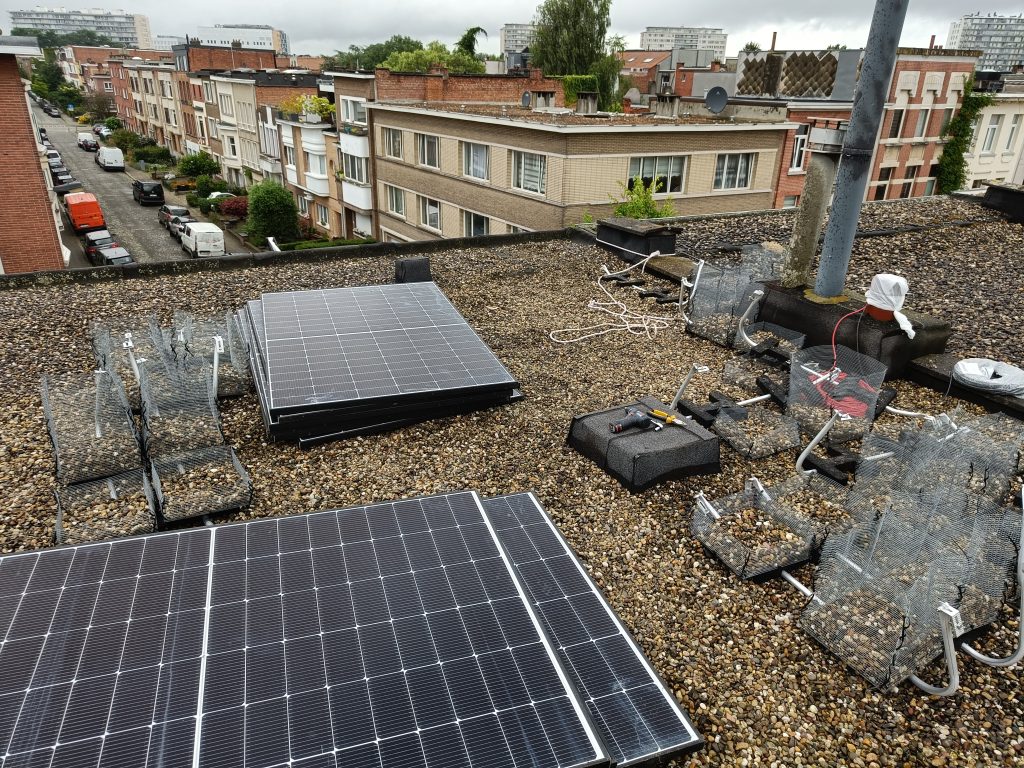
Ballast weight
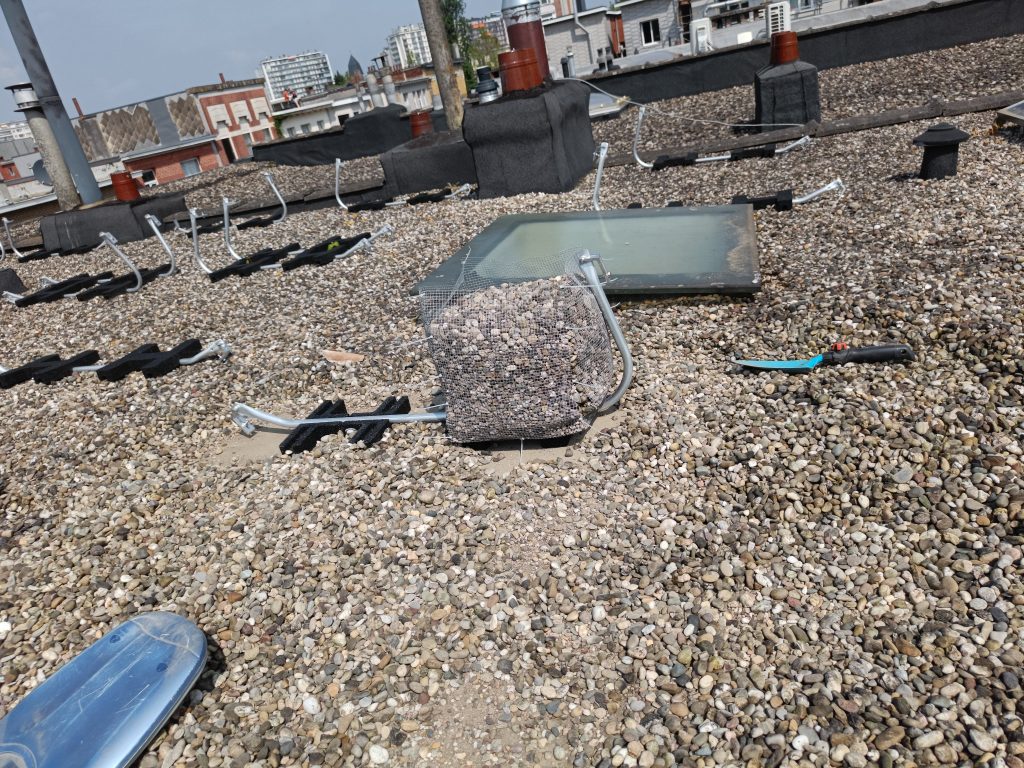
To keep the solar panels on the roof and ensure they don’t get blown away by the wind I needed around 80kg of extra weight per solar panel. With the mounting system I used this is usually done with concrete tiles.
However, our roof already had a thick layer of gravel protect the roof against the sun. Because this already weighs a lot, I could not add too much extra weight.
So instead I made containers to hold some of the gravel and use that as a ballast weight instead.
Because the solar panels already protect the roof against the elements I could greatly reduce the amount of gravel underneath them, and by making the gravel layer slightly thinner on other places on the roof I had more than enough to provide 80kg per panel.
The containers are made of metal fencing used used for rodent protection.
I chose this type of fencing because the holes were small enough to hold the small stones.
It is also made of galvanized steel, this way it can survive a long time without corrosion damage.
It is also a very cheap material while being perfect for this application.
The only downside was the amount of work needed to build 1 square container.
I used six rolls of 6x6mm 0,65mm 100cm x 5m rodent fencing.
These were the calculations for the containers:
Large cube
cut roll 102x30cm 2x per cube
Bend at 36x30x36cm 2x per cube
Cube size: 30x30x36cm
Should hold ~50kg
Minimum weight: 41 kg
Small cube
cut roll 102x30cm 1x, cut again into 51x30cm
Bend at 10.5x30x10.5cm
Cube size: 10.5x30x10.5cm
Should hold ~20kg
min weight 18kg
The first fill test exceeded weight expectations because the material bulged a bit.
I only needed to change the way the zip ties close the ends of to ensure no loss of material.
And change the zip tie material to be UV resistant.
I eventually used zip ties made from polyamide 6.6, these are UV resistant and resistant to diluted acids and oils
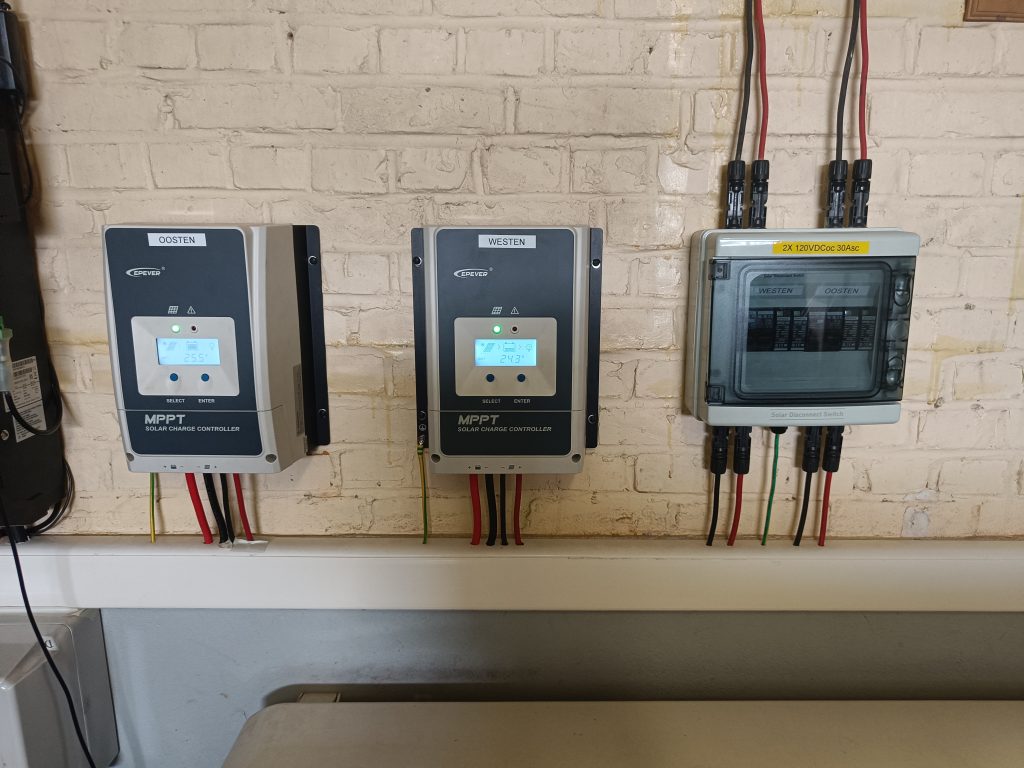
MPPT
To convert high voltage from the solar panels at the appropriate current to reach the maximum power point a Maximum Power Point Tracker is needed.
I decided to get 2 Tracer 5420AN from Epever.
These are 1/3 the cost of equivalent Victron MPPT’s.
In my experience, they are quite good quality.
The only downside is they are annoying to program and hard to integrate with Venus OS
Specifications:
- LIFEPO4 battery type compatible
- 50A
- 48V output
- 180V max open circuit input PV voltage
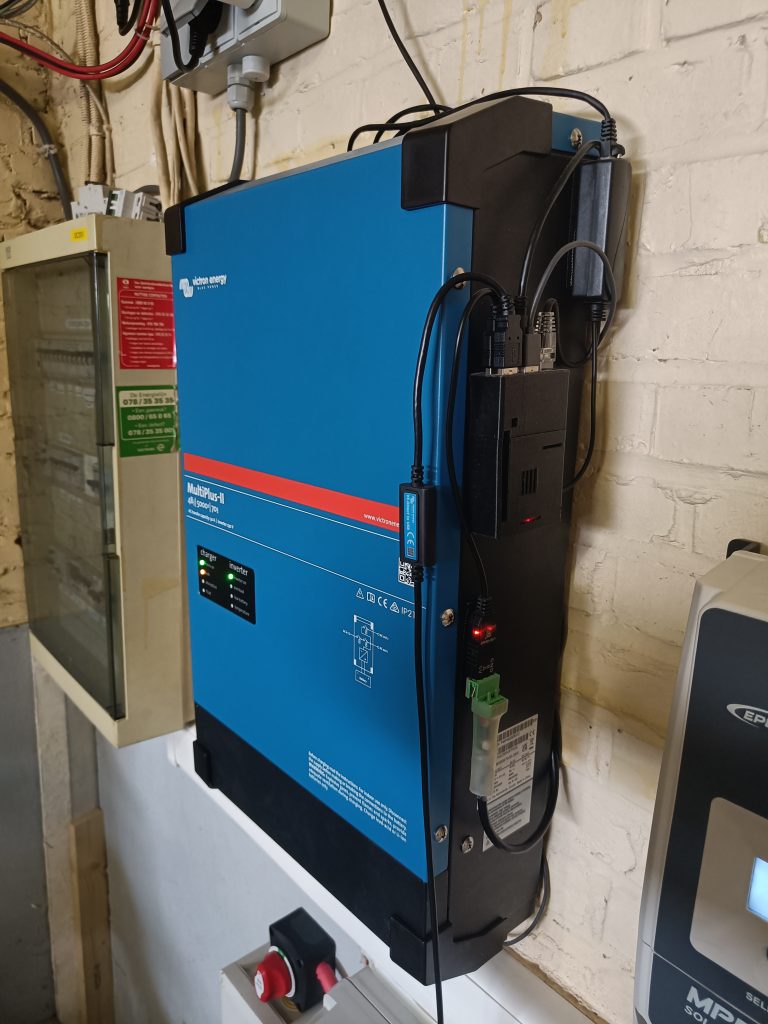
Victron inverter
I decided to use a Victron inverter mainly because of the great quality and the ability customize a lot with automation and Node red.
This inverter can also be fully locally controlled, or with VRM provided by Victron.
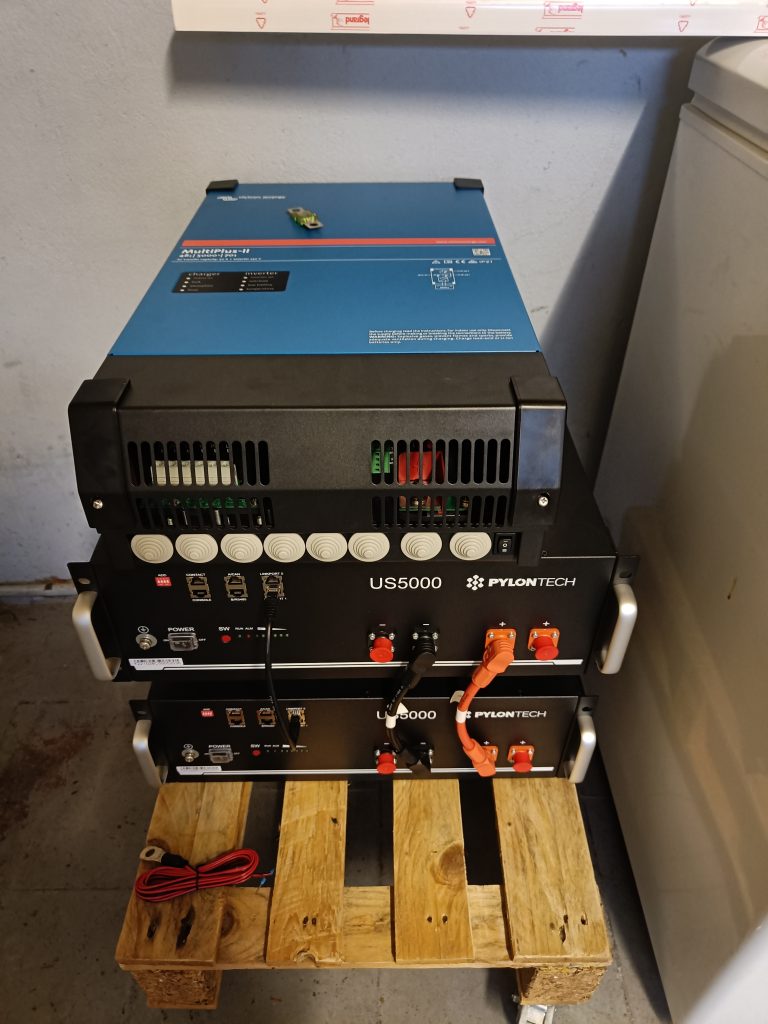
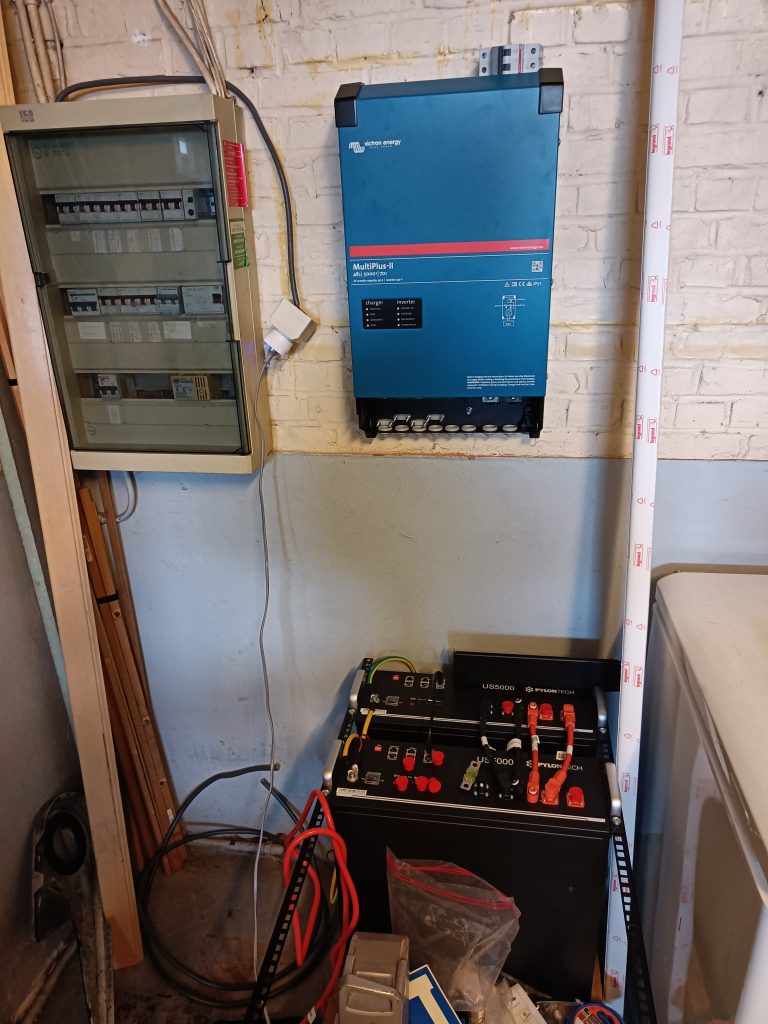
I am using the Multiplus II 48/5000/70-50
Important specs:
- 4Kw continuous output power
- 5.2Kw peak for 30min
- UPS function
- 50A transfer switch
- 70A battery charger

Datasheet
Venus OS on a raspberry pi
The inverter needs a control system, either built in with the GX model, or externally with a controller.
Victron sells external controllers like the Cerbo GX. But because they are quite expensive at more than €200, I decided to use a raspberry pi 3 I still had laying around.
Venus OS is open source and can be installed on some raspberry pi boards.
Victron provides a great explanation on how to install it here.
I recommend installing the large image to enable all the extra features like Node red.
Hardware communication connections
The raspberry pi needs a communication connection with all the devices in the system.
3 different protocols are used in this system
- RS485 (grid meter)
- CAN bus (Battery)
- VE bus (inverter)
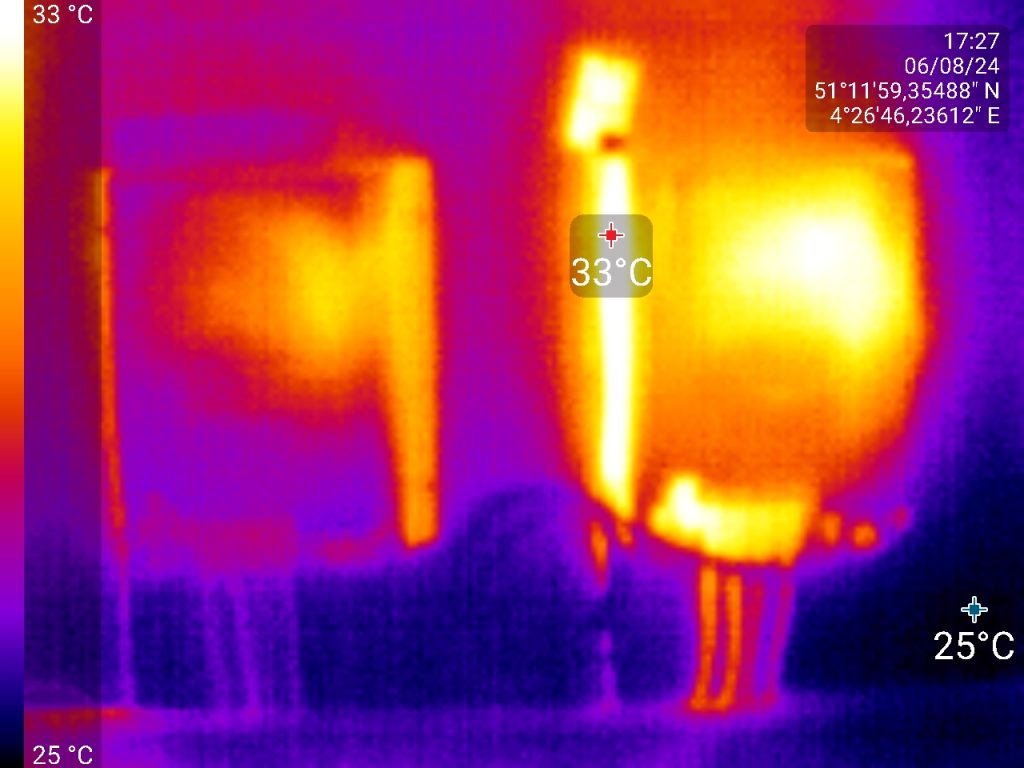
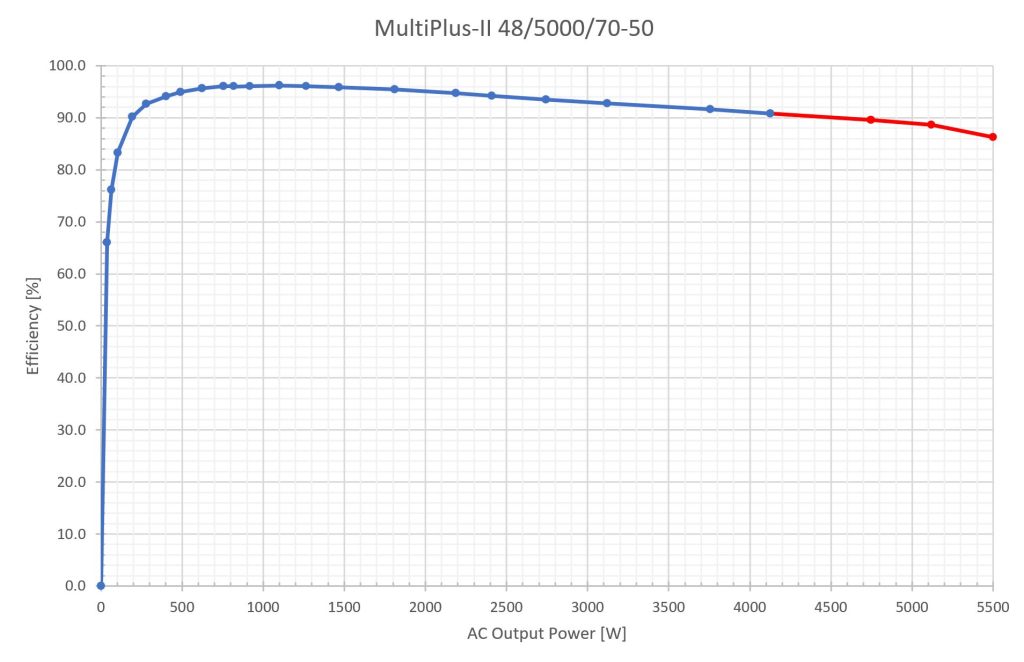
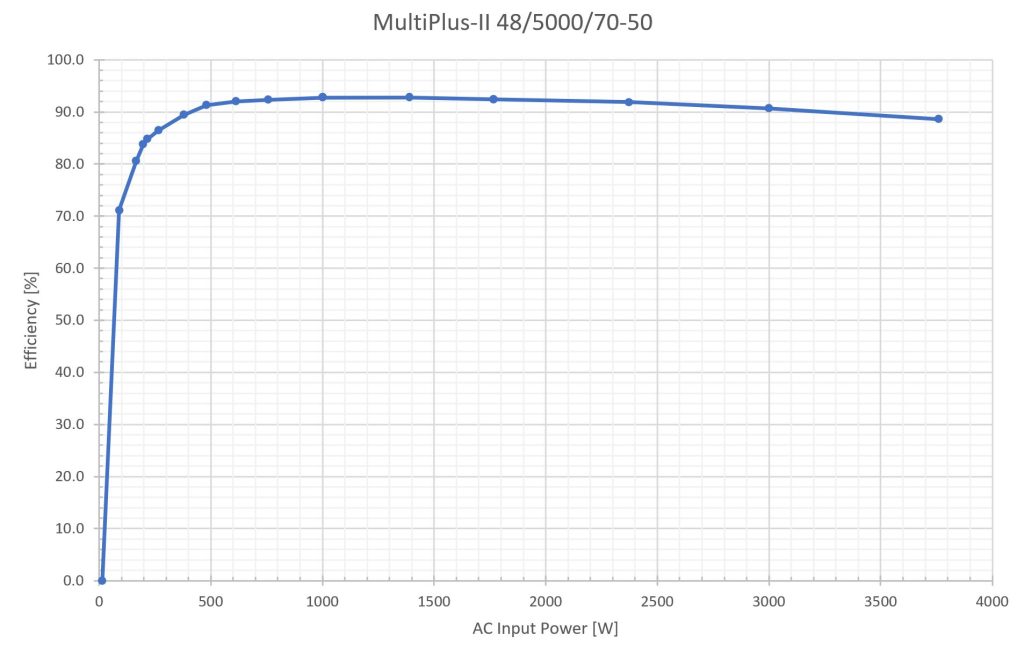
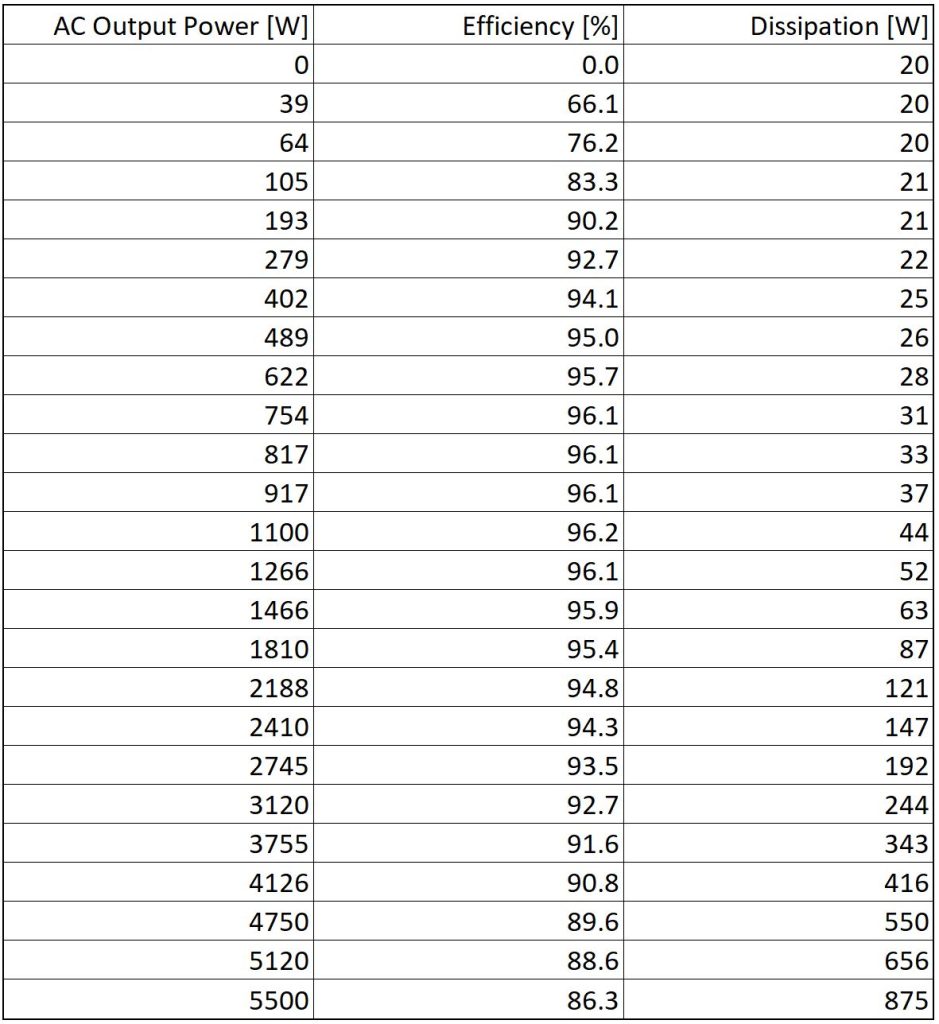
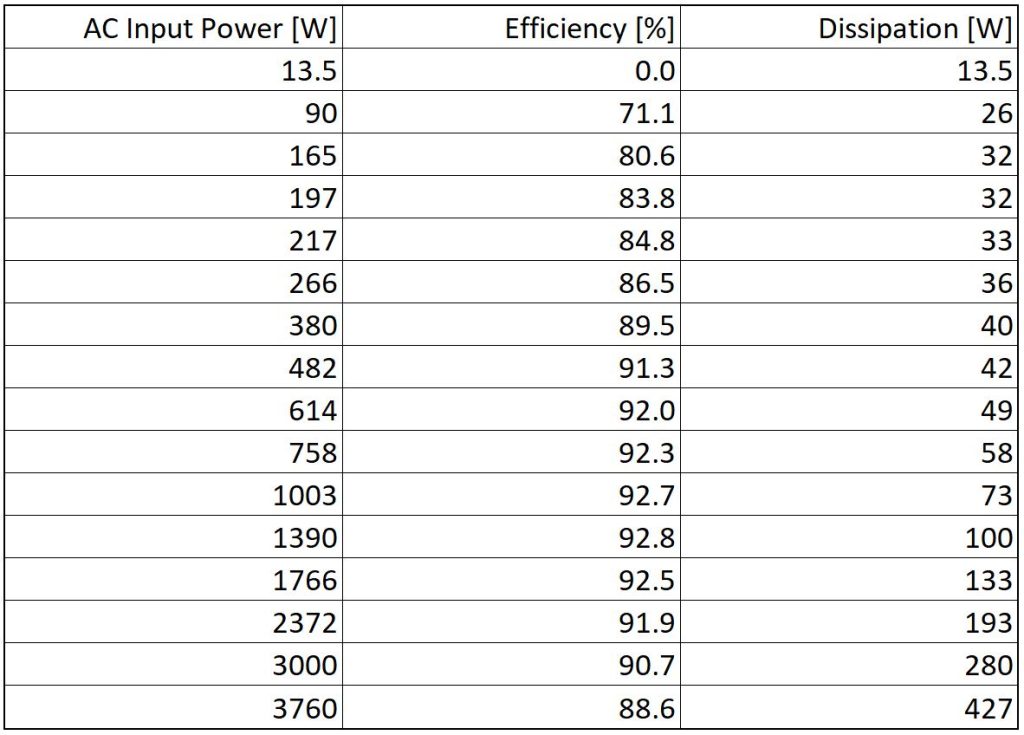
Efficiency
I found some power efficiency graphs from this forum post.
Because the efficiency is quite low at low input and output power I programmed my automation to operate at a minimum of 200w and default to 500W
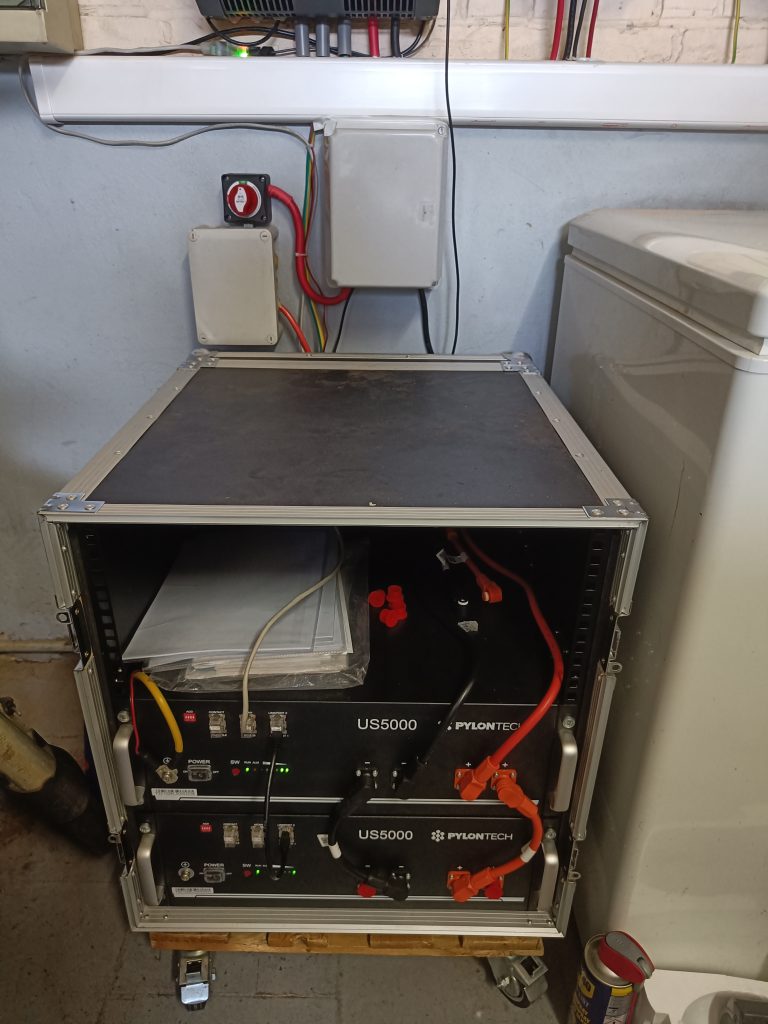
Battery
To store excess power from the solar panels and use it during the night I used a 9Kwh battery.
This is not big enough to store all the energy on sunny days but is enough to cover night usage.
This battery will also be used to buy & sell power with a dynamic energy contract.
- 9Kwh usable capacity
- 160A recommended max current (fused and software limited at 120A)
Automation
Victron devices and Venus OS have the ability to be controlled by Node-RED. This creates the possibility to automate certain actions and add much more functionality.
Solar power follower
With the default configuration from Venus OS the inverter would turn on when the battery reached +5% from the setpoint and then supply the whole house of power discharging the battery. If the power from the solar panels was lower than the house consumption the system would keep cycling between supplying the house with power and discharging and then waiting for the battery to charge again.
I wanted the system to follow solar power to reduce cycle wear on the battery and inverter.
Unfortunately Victron does not have this function by default so I created my own automation with Node-RED to change the gridsetpoint to achieve this.
This automation is achieved in 3 stages.
Here is the entire flow available for download.
Explanation of all the stages is further below.
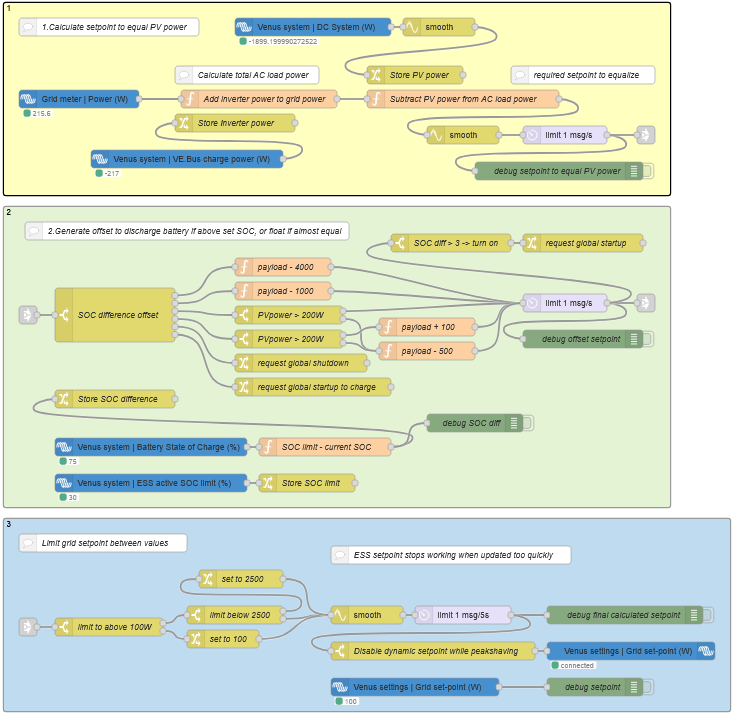
Calculate setpoint to equal PV power
Firstly I need to know the total power consumption of the house.
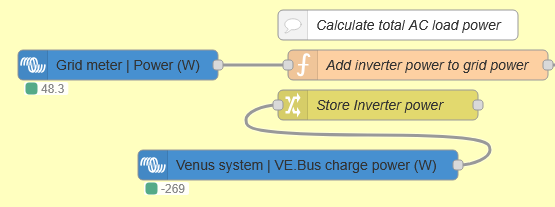
Normally this is easily done by measuring it at the grid meter, but we need to keep in mind the inverter will also provide power. So we need to add the inverter power to the grid power first to get the total consumption.
The next step is to subract the PV power from the total AC consumption.
This will give the exact required setpoint to equal the PV production.
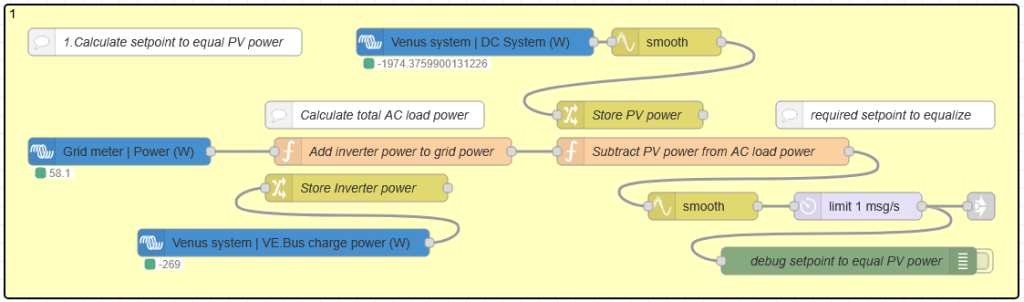
generate offset depending on situation
In case the solar panels are producing more power than is consumed the battery will start to charge, in that case we need to create an offset to discharge the battery again when possible.
I also added the ability to shut down the inverter when not needed to save a bit on idle power use.
This flow will enable different offsets depending on how much the battery is charged above the requested level.
With a high SOC difference the system will try to discharge the battery with 1 or 4Kw until at the desired level again.
If the SOC difference is slightly above the setpoint the system will keep the inverter output equal to the PV production making the battery float.
And if the SOC difference is very low it will first charge the battery very slowly with 100W
I also added the -500W offset in case the PV production is below 200W.
This is to prevent the inverter from working at very low power levels due to efficiency losses.
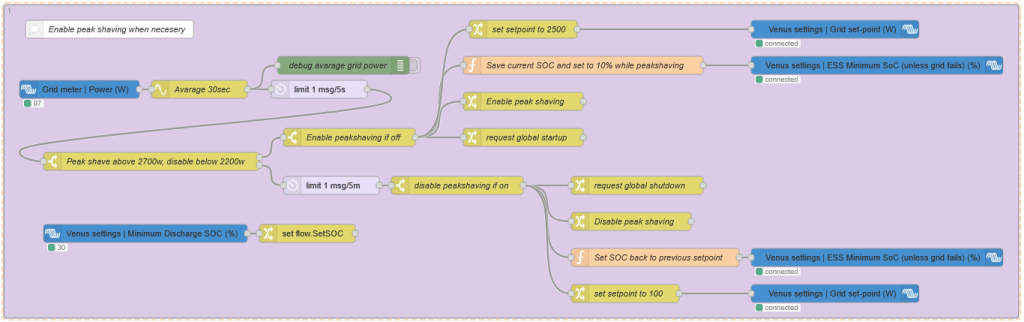
Peak shaving
In Belgium we are charged for the average peak we consume in a 15 minute window.
To combat this I also want the inverter to limit our peak power use to 2.5Kw.
Victron already has a peakshaving option but this only limits the grid current and is more catered to systems with a limited mains connection.
Because I have a 3 phase system it wouldn’t work in my situation.
That’s why I created my own simple peakshaving flow.
The system will monitor the average consumption of the last 30 seconds and if this exceeds 2700w it will turn on the inverter and put the setpoint at 2.5Kw.
To enable discharging below the regular minimum requested SOC the system will set the SOC to 10% while peak shaving.
Startup & shutdown
To save some more power I also added a small flow to shutdown the inverter while no power is needed.

This will turn the inverter on if power is requested by the PV follower or the peak shaving flow.
The inverter can only be shut down every 30min to prevent it from cycling in certain conditions.
Electricity
This project also required heavy modification to the house electricity installation, not only to support the new inverter setup but also to get it up to code for the inspection.
New drawings of the whole instalation also had to be made.
I will only share the one-wire diagram for privacy reasons.