To monitor the power usage of many of my devices I started looking into smart plugs and came across the “Shelly plug S”
advantages of this model:
- cheap (€20 a piece at the time of writing)
- ESP8266 used allows for reflashing with your own code
- power monitoring and switchable
disadvantages:
- only 10A rated
- Accuracy is quite bad, even after calibration the values jump around
- low update speed to accurately measure low power (explained why below)
- wifi instead of Zwave or Zigbee (been stable for me but this depends on your wifi network)
- Wifi antenna is not great but not terrible
How to program?
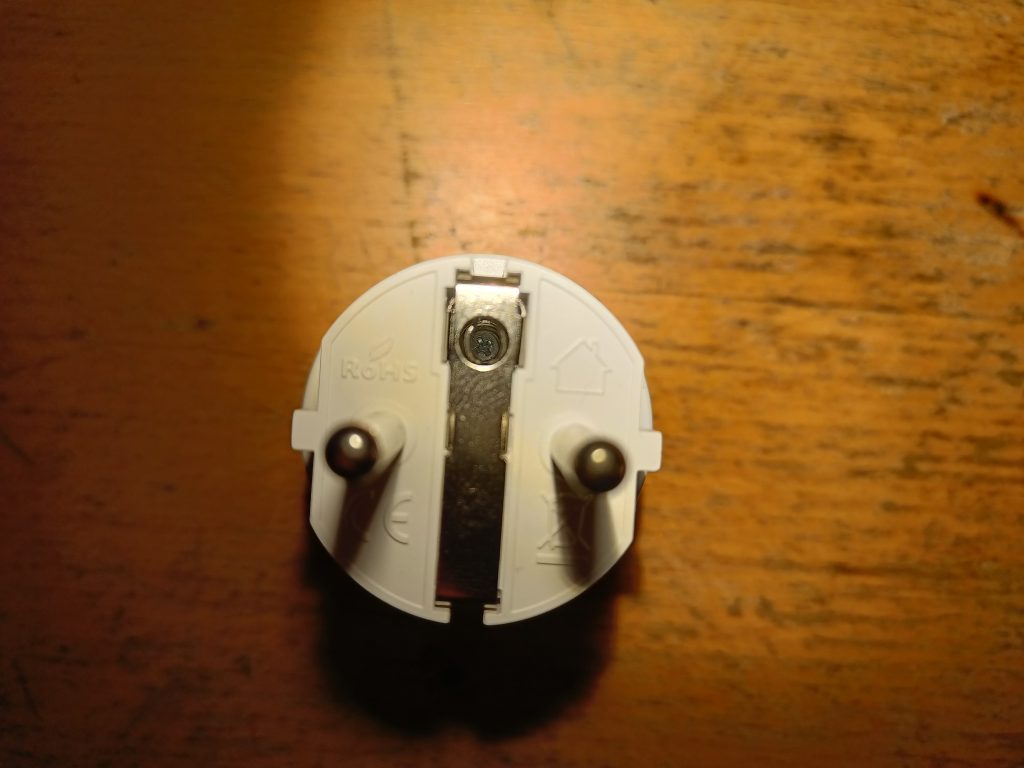
Opening it is easy, there is a screw hidden inside the ground plug, unscrew this and the front pops loose.
Be aware there is a small thermal pad that can fall out.
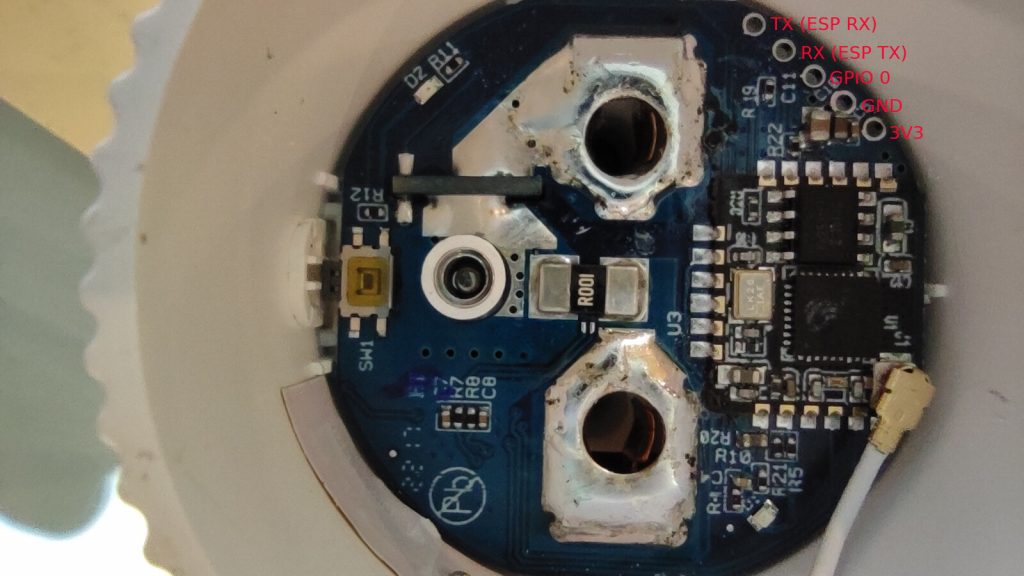
I got the pinout from this post on the HA forum.
I was able to flash the ESP by pushing Dupont wires which are also used with breadboards through the holes and keeping a bit of sideways pressure while flashing.
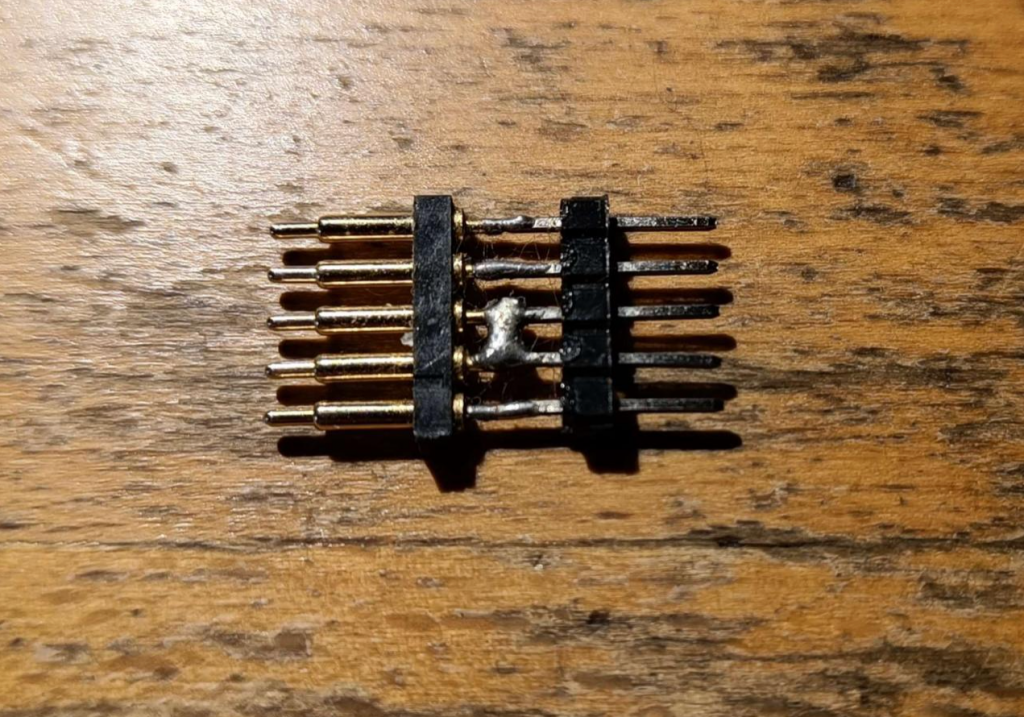
But because that method would always work well I switched over to using pogo pins with a header soldered on.
The hardware
The power plug uses the eps8266 as its main IC, and because there is a header that exposes the pins needed for programming, reprograming it is really easy.
The antenna is a flex pcb with a trace, this does work but does not offer the best connection, I have noticed it is slightly worse than a normal pcb antena as some esp dev boards use.
The HLW8012 IC is used for the energy monitoring, this IC can measure active power,voltage and current but does not calculate energy used, this has to be done in software.
The active power value is sent to the esp via a variable frequency from the HLW8012, so when the measured active power is low the output frequency is low as well. 12w is already only 1HZ, so if we would want to measure 1.2w it would take us 10 seconds to know that..
Because of that the update speed of the measured power can get really slow when trying to measure low power devices.
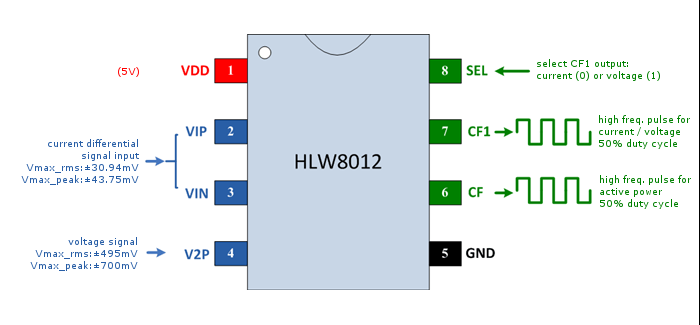
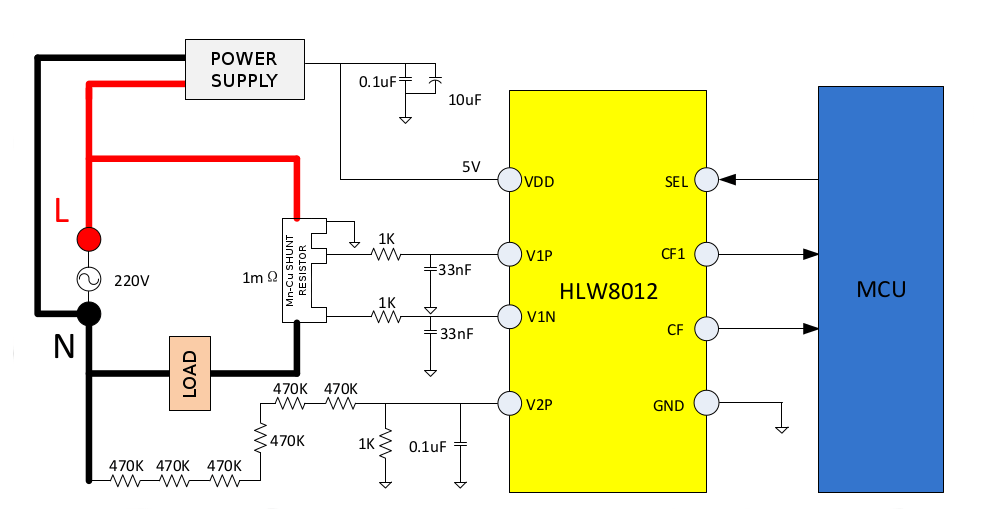
The current sense resistor used in the shelly plug is 1mΩ with an accuracy of 10-20%, if you want to be somewhat accurate I should suggest calibrating the plug before putting them to use.
The internal temperature is monitored with a NTC, this is really important for the safety of the device. when drawing large loads for longer duration the temperature can get dangerously high. I have experienced overtemperature when drawing a load of 2000W for 15 min.
The 2300W power rating of the plug cannot be sustained for long..
The software
Most of my code is based on the config found on the esphome devices forum, I made some adjustments to make it safer and adjust it to my liking.
One important change I made was adding an overcurrent protection before the esp devices forum had some code that did not have that present. When a large load is connected with a bad power factor the current can go well above the rated 10A while staying below the 2300w limit. The temperature protection might not trip fast enough if the overcurrent is large enough.
Each shelly plug has their own config that contains the name and some config and calibration data.
substitutions:
  devicename: shelly-ps-01
  channel_1: Relay

  max_power: "2200"

  # Higher value gives lower watt readout
  current_res: "0.001100"
  # Lower value gives lower voltage readout
  voltage_div: "1911"
  # Power does not seem to calculated with the calibrated voltage and current vallues, Power needs its own callibration
  Power_calibration_multiplier: "1.03888"

packages:
  base-config: !include x-shelly-ps-00-base-config.yaml
  debug-info: !include x-debug-info.yaml
This is the base config for the plugs containing all the sensor configuration.
substitutions:
  #filter settings
  window_size: "3"
  send_every: "1"
  send_first_at: "1"

  max_current: "10"
  max_temp: "70.0"

  update_interval: "3s" #update interval in seconds # low update interval will cause inacurate results, measurements are based on pulses # https://tinkerman.cat/post/hlw8012-ic-new-sonoff-pow
  update_interval_slow: "5s" #update interval in seconds

esphome:
  name: "${devicename}"

esp8266:
  board: esp01_1m

logger:

api:
  encryption:
    key: "ThPfR6f+epdPwN0bx63o4+yEfejlq4DP8juJfaNr0jE="

ota:
  password: "297e7ca2c43a39cf7c8cb62c808797b2"

wifi:
  networks:
  - ssid: !secret wifi_ssid
    password: !secret wifi_password
    #manual_ip:
    #  static_ip: "${static_ip}"
    #  gateway: 10.10.1.1
    #  subnet: 255.255.255.0
    #use_address: "${use_ip}"
  reboot_timeout: 120min

time:
  - platform: sntp
    id: my_time

binary_sensor:
  - platform: gpio
    pin:
      number: GPIO13
      inverted: True
    name: "${devicename}_button"
    on_press:
      - switch.toggle: relay

#red led for status
status_led:
  pin:
    number: GPIO00
    inverted: True

#blue light to indicate power
output:
  - platform: gpio
    pin: GPIO02
    inverted: true
    id: led

#relay
switch:
  - platform: gpio
    pin: GPIO15
    id: relay
    restore_mode: RESTORE_DEFAULT_ON
    name: "${channel_1}"
    on_turn_on:
      - output.turn_on: led
    on_turn_off:
      - output.turn_off: led

sensor:
  # NTC Temperature
  - platform: ntc
    sensor: temp_resistance_reading
    name: ${devicename} temperature
    unit_of_measurement: "°C"
    accuracy_decimals: 1
    icon: "mdi:thermometer"
    filters:
       - median:
          window_size: ${window_size}
          send_every: ${send_every}
          send_first_at: ${send_first_at}
    calibration:
      b_constant: 3350
      reference_resistance: 10kOhm
      reference_temperature: 298.15K
    on_value_range:
      - above: ${max_temp}
        then:
          - switch.turn_off: relay
          - homeassistant.service:
              service: persistent_notification.create
              data:
                title: Message from ${devicename}
              data_template:
                message: Switch turned off because temperature exceeded ${max_temp}°C
  - platform: resistance
    id: temp_resistance_reading
    sensor: temp_analog_reading
    configuration: DOWNSTREAM
    resistor: 32kOhm
  - platform: adc
    id: temp_analog_reading
    pin: A0
    update_interval: ${update_interval_slow}

  - platform: hlw8012
    model: BL0937
    sel_pin:
      number: GPIO12
      inverted: true
    cf_pin: GPIO05
    cf1_pin: GPIO14
    current_resistor: ${current_res}
    voltage_divider: ${voltage_div}
    current:
      name: "${channel_1} current"
      unit_of_measurement: "A"
      accuracy_decimals: 1
      icon: mdi:flash-outline
      filters:
       - median:
          window_size: ${window_size}
          send_every: ${send_every}
          send_first_at: ${send_first_at}
      on_value_range:
        - above: ${max_current}
          then:
            - switch.turn_off: relay
            - homeassistant.service:
                service: persistent_notification.create
                data:
                  title: Message from ${devicename}
                data_template:
                  message: Switch turned off because current exceeded ${max_current}A
    voltage:
      name: "${channel_1} voltage"
      unit_of_measurement: "V"
      icon: mdi:flash-outline
      accuracy_decimals: 0
      filters:
       - median:
          window_size: ${window_size}
          send_every: ${send_every}
          send_first_at: ${send_first_at}
    power:
      name: "${channel_1} power"
      id: power
      unit_of_measurement: "W"
      accuracy_decimals: 0
      filters:
       - multiply: ${Power_calibration_multiplier}
       - median:
          window_size: ${window_size}
          send_every: ${send_every}
          send_first_at: ${send_first_at}
      icon: mdi:flash-outline
      on_value_range:
        - above: ${max_power}
          then:
            - switch.turn_off: relay
            - homeassistant.service:
                service: persistent_notification.create
                data:
                  title: Message from ${devicename}
                data_template:
                  message: Switch turned off because power exceeded ${max_power}W
    change_mode_every: "2"
    update_interval: ${update_interval}

  - platform: total_daily_energy
    name: "${channel_1} daily energy"
    power_id: power
    filters:
      # Multiplication factor from W to kW is 0.001
      - multiply: 0.001
    unit_of_measurement: kWh
Great manual!
With this clear guidelines and code I had my shelly plug working on the 1st go.
Thanks!